Building an Efficient TensorFlow Input Pipeline for Word-Level Text Generation
This tutorial is the third part of the “Text Generation in Deep Learning with Tensorflow & Keras” series.
In this series, we have been covering all the topics related to Text Generation with sample implementations in Python. This tutorial will focus on how to build an Efficient TensorFlow Input Pipeline for Word-Level Text Generation. First, we will download a sample corpus (text file). After opening the file and reading it line-by-line, we will split the text into words. Then, we will generate pairs including an input word sequence (X) and an output word (y).
Using tf.data API and Keras TextVectorization methods, we will
- preprocess the text,
- convert the words into integer representation,
- prepare the training dataset from the pairs,
- and optimize the data pipeline.
Thus, in the end, we will be ready to train a Language Model for word-level text generation.
If you would like to learn more about Deep Learning with practical coding examples, please subscribe to Murat Karakaya Akademi YouTube Channel or follow my blog on muratkarakaya.net. Do not forget to turn on notifications so that you will be notified when new parts are uploaded.
If you are ready, let’s get started!
Photo by Quinten de Graaf on Unsplash
I assume that you have already watched all the previous parts. Please ensure that you have reviewed the previous parts to utilize this part better.
What is a Word Level Text Generation?
A Language Model can be trained to generate text word-by-word.
In this case, each of the input and output tokens is made of word tokens.
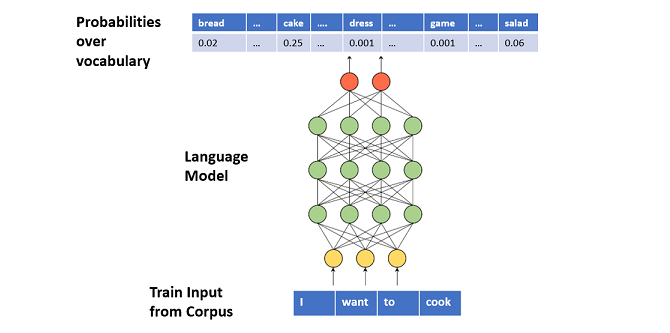
In training, we supply a sequence of words as input (X) and a target word (next word to complete the input) as output (y)
After training, the Language Model learns to generate a conditional probability distribution over the vocabulary of words according to the given input sequence.

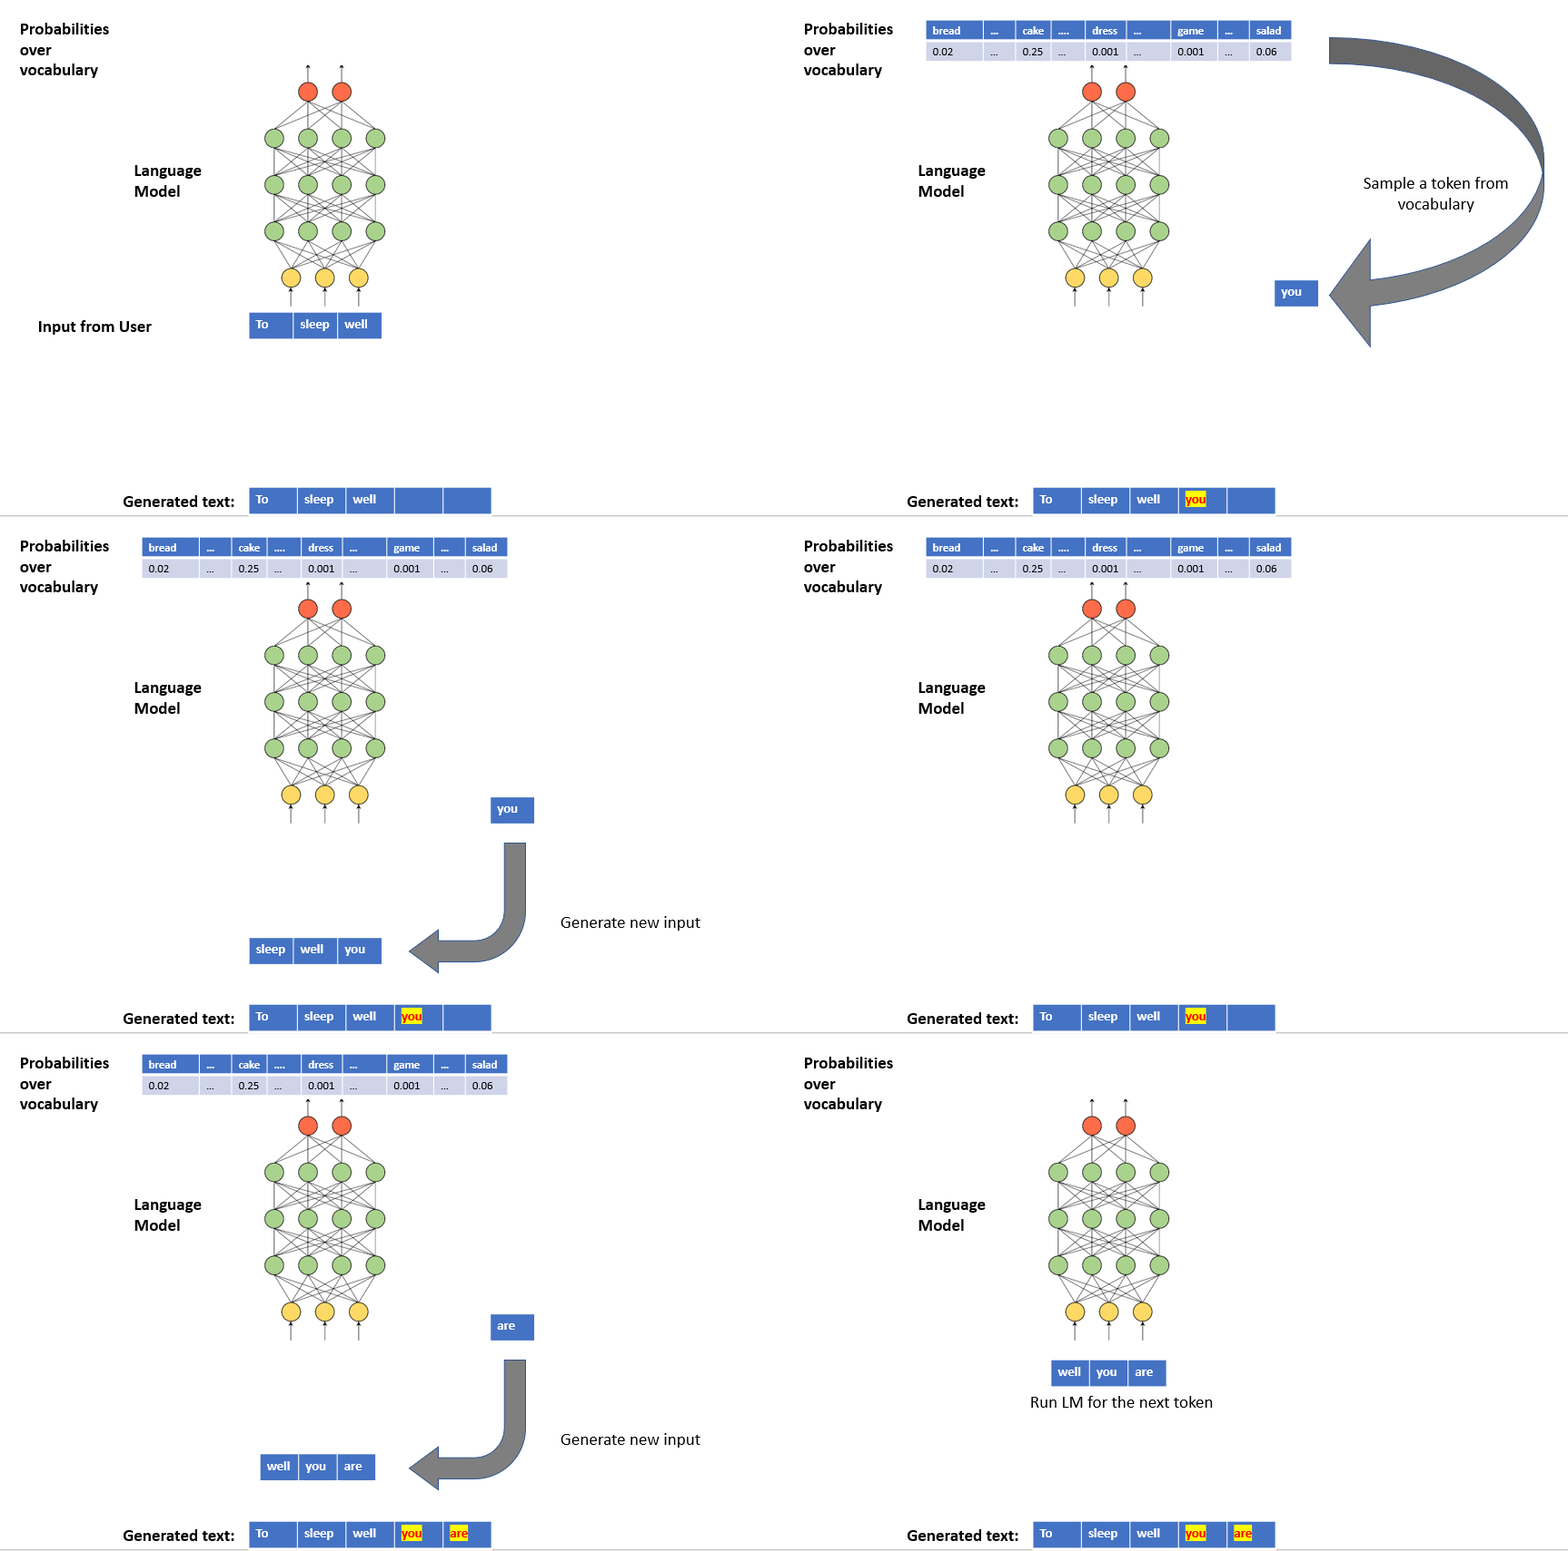
To generate text, we can iterate over the below steps:
- Step 1: we provide a sequence of words to the Language Model as input
- Step 2: the Language Model outputs a conditional probability distribution over the vocabulary
- Step 3: we sample a word from the distribution
- Step 4: we concatenate the newly sampled word to the generated text
- Step 4: a new input sequence is generated by appending the newly sampled word
For more details, please check Part A and B.

Tensorflow Data Pipeline: tf.data
What is a Data Pipeline?
Data Pipeline is an automated process that involves extracting, transforming, combining, validating, and loading data for further analysis and visualization.
It provides end-to-end velocity by eliminating errors and combatting bottlenecks or latency.
It can process multiple data streams at once.
In short, it is an absolute necessity for today’s data-driven solutions.
If you are not familiar with data pipelines, you can check my tutorials in English or Turkish.
Why Tensorflow Data Pipeline?
The tf.data API enables us
- to build complex input pipelines from simple, reusable pieces.
- to handle large amounts of data, read from different data formats, and perform complex transformations.
What can be done in a Text Data Pipeline?
The pipeline for a text model might involve extracting symbols from raw text data, converting them to embedding identifiers with a lookup table, and batching together sequences of different lengths.
What will we do in this Text Data pipeline?
We will create a data pipeline to prepare training data for word-level text generators.
Thus, in the pipeline, we will
- open & load corpus (text file)
- convert the text into a sequence of words
- generate input (X) and output (y) tuples as word sequences
- remove unwanted tokens such as punctuations, HTML tags, white spaces, etc.
- vectorize the input (X) and output (y) tuples
- concatenate input (X) and output (y) into train data
- cache, prefetch, and batch the data pipeline for performance

After, this brief introduction to the Tensorflow Data pipeline, let’s start creating our text pipeline.
Building an Efficient TensorFlow Input Pipeline for Word-Level Text Generation
1. DOWNLOAD DATA
!curl -O https://s3.amazonaws.com/text-datasets/nietzsche.txt2. LOAD TEXT DATA LINE BY LINE
To load the data into our pipeline, I will use tf.data.TextLineDataset() method.
raw_data_ds = tf.data.TextLineDataset(["nietzsche.txt"])Let’s see some lines from the uploaded text:
for elems in raw_data_ds.take(10):
    print(elems.numpy()) #.decode("utf-8")b'PREFACE'
b''
b''
b'SUPPOSING that Truth is a woman--what then? Is there not ground'
b'for suspecting that all philosophers, in so far as they have been'
b'dogmatists, have failed to understand women--that the terrible'
b'seriousness and clumsy importunity with which they have usually paid'
b'their addresses to Truth, have been unskilled and unseemly methods for'
b'winning a woman? Certainly she has never allowed herself to be won; and'
b'at present every kind of dogma stands with sad and discouraged mien--IF,'
3. SPLIT THE TEXT INTO WORD TOKENS
In Part A, we mentioned that we can train a language model and generate new text by using two different units:
- character level
- word level
That is, you can split your text into a sequence of characters or words.
In this tutorial, we will focus on word-level tokenization.
If you would like to learn how to create char level tokenization please take a look at Part B.
raw_data_ds= raw_data_ds.map(lambda x: tf.strings.split(x))
for elems in raw_data_ds.take(5):
    print(elems.numpy())[b'PREFACE']
[]
[]
[b'SUPPOSING' b'that' b'Truth' b'is' b'a' b'woman--what' b'then?' b'Is'
 b'there' b'not' b'ground']
[b'for' b'suspecting' b'that' b'all' b'philosophers,' b'in' b'so' b'far'
 b'as' b'they' b'have' b'been']
Flatten the dataset for further processing:
raw_data_ds=raw_data_ds.flat_map(lambda x: tf.data.Dataset.from_tensor_slices(x))
for elems in raw_data_ds.take(5):
    print(elems.numpy())b'PREFACE'
b'SUPPOSING'
b'that'
b'Truth'
b'is'
4. GENERATE X & y TUPLES
We can split the text into two datasets as below:
- The first dataset (X) is the input data to the model which will hold fixed-size word sequences (partial sentences)
- The second dataset (y) is the output data which has only one-word samples (next word)
To create these datasets (X input sequence of words & y next word), we can apply tf.data.Dataset.window() transformation.
First, define the size of the input sequence: How many words will be in the input?
input_sequence_size= 4Then, apply the window() transformation such that each window will have input_sequence_size+1 words (|X|+|y|)
sequence_data_ds=raw_data_ds.window(input_sequence_size+1, drop_remainder=True)
for window in sequence_data_ds.take(3):
  print(list(window.as_numpy_iterator()))[b'PREFACE', b'SUPPOSING', b'that', b'Truth', b'is']
[b'a', b'woman--what', b'then?', b'Is', b'there']
[b'not', b'ground', b'for', b'suspecting', b'that']
However, the window() method returns a dataset containing windows, where each window is itself represented as a dataset. Something like {{1,2,3,4,5},{6,7,8,9,10},...}, where {...} represents a dataset.
print(window)<_VariantDataset shapes: (), types: tf.string>
But we just want a regular dataset containing tensors: {[1,2,3,4,5],[6,7,8,9,10],…}, where […] represents a tensor. The flat_map() method returns all the tensors in a nested dataset, after transforming each nested dataset.
If we didn’t batch, we would get: {1,2,3,4,5,6,7,8,9,10,…}. By batching each window to its full size, we get {[1,2,3,4,5],[6,7,8,9,10],…} as we desired.
You can find more details about the transformation here
sequence_data_ds = sequence_data_ds.flat_map(lambda window: window.batch(5))
for elem in sequence_data_ds.take(3):
  print(elem)tf.Tensor([b'PREFACE' b'SUPPOSING' b'that' b'Truth' b'is'], shape=(5,), dtype=string)
tf.Tensor([b'a' b'woman--what' b'then?' b'Is' b'there'], shape=(5,), dtype=string)
tf.Tensor([b'not' b'ground' b'for' b'suspecting' b'that'], shape=(5,), dtype=string)
Now each item in the dataset is a tensor, so we can split it into X & y datasets:
sequence_data_ds = sequence_data_ds.map(lambda window: (window[:-1], window[-1:]))
X_train_ds_raw = sequence_data_ds.map(lambda X,y: X)
y_train_ds_raw = sequence_data_ds.map(lambda X,y: y)
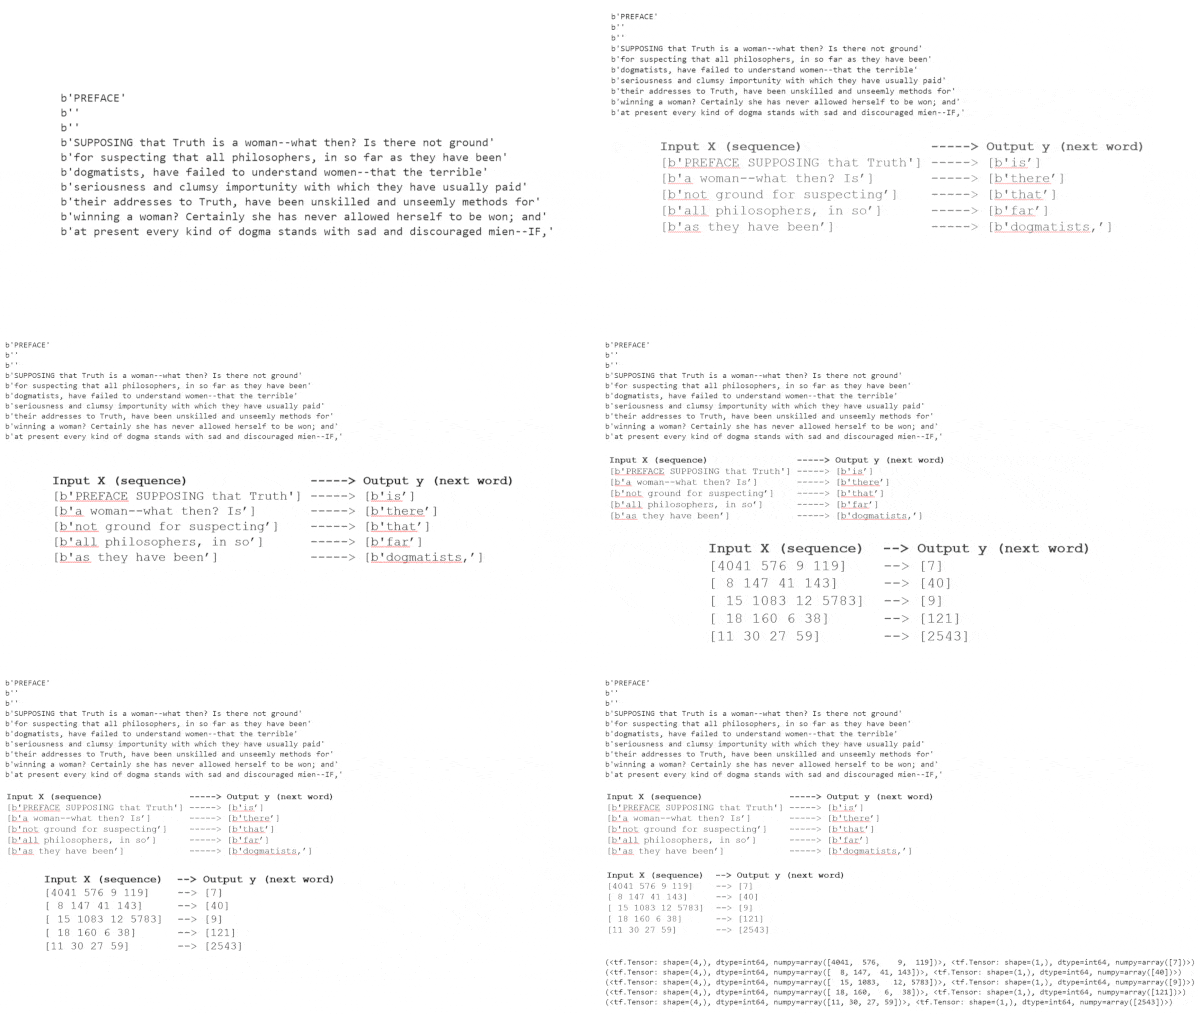
Let’s see some input-output pairs:
print("Input X  (sequence) \t\t    ----->\t Output y (next word)")
for elem1, elem2 in zip(X_train_ds_raw.take(3),y_train_ds_raw.take(3)):
   print(elem1.numpy(),"\t\t----->\t", elem2.numpy())Input X  (sequence) 	                ----->  Output y (next word)
[b'PREFACE' b'SUPPOSING' b'that' b'Truth'] 	----->	 [b'is']
[b'a' b'woman--what' b'then?' b'Is'] 		----->	 [b'there']
[b'not' b'ground' b'for' b'suspecting'] 	----->	 [b'that']
5. RESHAPE X DATASET
Input (X) is a vector of strings but we need to convert it to a string vector so that we can vectorize it properly.
Below is a python function for iterating the given tensor to join all the strings into a single string:
def convert_string(X: tf.Tensor):
  str1 = ""
  for ele in X:
    str1 += ele.numpy().decode("utf-8")+" "
  str1= tf.convert_to_tensor(str1[:-1])
  return str1
We apply the convert_string function to every element of X_train_ds_raw
Note that to use a python function as a mapping function, you need to apply tf.py_function(). For more, please see the documentation here
X_train_ds_raw=X_train_ds_raw.map(lambda x: tf.py_function(func=convert_string,
          inp=[x], Tout=tf.string))
After transformation, we have samples in X_train_ds_raw as desired:
print("Input X  (sequence) \t\t    ----->\t Output y (next word)")
for elem1, elem2 in zip(X_train_ds_raw.take(5),y_train_ds_raw.take(5)):
   print(elem1.numpy(),"\t\t----->\t", elem2.numpy())Input X  (sequence) 		 ----->	 Output y (next word)
b'PREFACE SUPPOSING that Truth' 	----->	 [b'is']
b'a woman--what then? Is' 		----->	 [b'there']
b'not ground for suspecting' 		----->	 [b'that']
b'all philosophers, in so' 		----->	 [b'far']
b'as they have been' 		        ----->	 [b'dogmatists,']
However, the shape of X is unknown:
print(X_train_ds_raw.element_spec, y_train_ds_raw.element_spec)TensorSpec(shape=<unknown>, dtype=tf.string, name=None) TensorSpec(shape=(None,), dtype=tf.string, name=None)
To fix this, we can explicitly set the shape with another transformation:
X_train_ds_raw=X_train_ds_raw.map(lambda x: tf.reshape(x,[1]))Now, it is ok
X_train_ds_raw.element_spec, y_train_ds_raw.element_spec(TensorSpec(shape=(1,), dtype=tf.string, name=None),
 TensorSpec(shape=(None,), dtype=tf.string, name=None))
6. PREPROCESS THE TEXT
We need to process these datasets before feeding them into a model.
Here, we will use the Keras preprocessing layer “TextVectorization”.
Why do we use Keras preprocessing layer?
- The Keras preprocessing layers API allows developers to build Keras-native input processing pipelines. These input processing pipelines can be used as independent preprocessing code in non-Keras workflows, combined directly with Keras models, and exported as part of a Keras SavedModel.
- With Keras preprocessing layers, we can build and truly end-to-end export models: models that accept raw images or raw structured data as input; models that handle feature normalization or feature value indexing on their own.
In the next part, we will create the end-to-end Text Generation model and we will see the benefits of using Keras preprocessing layers.
What are the preprocessing steps?
The processing of each sample contains the following steps:
- standardize each sample (usually lowercasing + punctuation stripping):
- In this tutorial, we will create a custom standardization function to show how to apply your code to strip un-wanted chars and symbols.
- split each sample into substrings (usually words):
- As in this part, we aim at splitting the text into fixed-size word sequences, we do not need to use a custom split function.
- recombine substrings into tokens (usually ngrams): We will leave it as 1 ngram (word)
- index tokens (associate a unique int value with each token)
- transform each sample using this index, either into a vector of ints or a dense float vector.
Prepare custom standardization and split functions
- We have our custom standardization and split functions
def custom_standardization(input_data):
    lowercase     = tf.strings.lower(input_data)
    stripped_html = tf.strings.regex_replace(lowercase, "<br />", " ")
    stripped_num  = tf.strings.regex_replace(stripped_html, "[\d-]", " ")
    stripped_punc  =tf.strings.regex_replace(stripped_num,
                             "[%s]" % re.escape(string.punctuation), "")
    return stripped_punc
Set the text vectorization parameters
- We can limit the number of distinct words by setting
max_features - We set an explicit
sequence_length, since our model needs fixed-size input sequences.
max_features = 54762    # Number of distinct words in the vocabulary
sequence_length = input_sequence_size    # Input sequence size
batch_size = 128                # Batch size
Create the text vectorization layer
- The text vectorization layer is initialized below.
- We are using this layer to normalize, split, and map strings to integers, so we set our ‘output_mode’ to ‘int’.
vectorize_layer = TextVectorization(
    standardize=custom_standardization,
    max_tokens=max_features,
    # split --> DEFAULT: split each sample into substrings (usually words)
    output_mode="int",
    output_sequence_length=sequence_length,
)
Adapt the Text Vectorization layer to the training dataset
Now that the Text Vectorization layer has been created, we can call adapt on a text-only dataset to create the vocabulary with indexing.
You don’t have to batch, but for very large datasets this means you’re not keeping spare copies of the dataset in memory.
vectorize_layer.adapt(raw_data_ds.batch(batch_size))We can take a look at the size of the vocabulary
print("The size of the vocabulary (number of distinct words): ", len(vectorize_layer.get_vocabulary()))The size of the vocabulary (number of distinct words): 9903
Let’s see the first 5 entries in the vocabulary:
print("The first 10 entries: ", vectorize_layer.get_vocabulary()[:10])The first 10 entries: ['', '[UNK]', 'the', 'of', 'and', 'to', 'in', 'is', 'a', 'that']
You can access the vocabulary by using an index:
vectorize_layer.get_vocabulary()[3]'of'
After preparing the Text Vectorization layer, we need a helper function to convert a given raw text to a Tensor by using this layer:
def vectorize_text(text):
  text = tf.expand_dims(text, -1)
  return tf.squeeze(vectorize_layer(text))
A simple test of the function:
Apply the Text Vectorization onto X and y datasets
Notice that we have a vector of strings before the text vectorization
for elem in X_train_ds_raw.take(3):
  print("X: ",elem.numpy())X:  [b'PREFACE SUPPOSING that Truth']
X:  [b'a woman--what then? Is']
X:  [b'not ground for suspecting']# Vectorize the data.
X_train_ds = X_train_ds_raw.map(vectorize_text)
y_train_ds = y_train_ds_raw.map(vectorize_text)
After the text vectorization, we have a vector of integers
for elem in X_train_ds.take(3):
  print("X: ",elem.numpy())X:  [4041  576    9  119]
X:  [  8 147  41 143]
X:  [  15 1083   12 5783]X_train_ds_raw.element_spec, y_train_ds_raw.element_spec(TensorSpec(shape=(1,), dtype=tf.string, name=None),
 TensorSpec(shape=(None,), dtype=tf.string, name=None))
Convert y to a single char representation
Notice that even we want y to be a single word, after the text vectorization, it becomes a vector of integers as well!
We need to fix this.
for elem in y_train_ds.take(2):
  print("shape: ", elem.shape, "\n next_char: ",elem.numpy())shape:  (4,)
 next_char:  [7 0 0 0]
shape:  (4,)
 next_char:  [40  0  0  0]
We can solve this by simply selecting the first element of the array only.
y_train_ds=y_train_ds.map(lambda x: x[:1])Now, we have y as expected:
for elem in y_train_ds.take(2):
  print("shape: ", elem.shape, "\n next_char: ",elem.numpy())shape:  (1,)
 next_char:  [7]
shape:  (1,)
 next_char:  [40]
Let’s see an example pair:
for (X,y) in zip(X_train_ds.take(5), y_train_ds.take(5)):
  print(X.numpy(),"-->",y.numpy())[4041  576    9  119] --> [7]
[  8 147  41 143] --> [40]
[  15 1083   12 5783] --> [9]
[ 18 160   6  38] --> [121]
[11 30 27 59] --> [2543]
7. FINALIZE THE DATA PIPELINE
Join the input (X) and output (y) values as a single dataset
We can now zip these two sets together as a single training dataset.
However, notice that after the transformation, tensor shapes become unknown!
X_train_ds_raw.element_spec, y_train_ds_raw.element_spec(TensorSpec(shape=(1,), dtype=tf.string, name=None),
 TensorSpec(shape=(None,), dtype=tf.string, name=None))train_ds =  tf.data.Dataset.zip((X_train_ds,y_train_ds))
train_ds.element_spec(TensorSpec(shape=<unknown>, dtype=tf.int64, name=None),
 TensorSpec(shape=<unknown>, dtype=tf.int64, name=None))
To fix this we can apply another transformation to set the shapes explicitly.
You can find more explanation about this issue here
def _fixup_shape(X, y):
    X.set_shape([4])
    y.set_shape([1])
    return X, y
Let’s check the shapes of the samples after fixing:
train_ds=train_ds.map(_fixup_shape)
train_ds.element_spec(TensorSpec(shape=(4,), dtype=tf.int64, name=None),
 TensorSpec(shape=(1,), dtype=tf.int64, name=None))
Everything seems O.K. :)
for el in train_ds.take(5):
  print(el)(<tf.Tensor: shape=(4,), dtype=int64, numpy=array([4041,  576,    9,  119])>, <tf.Tensor: shape=(1,), dtype=int64, numpy=array([7])>)
(<tf.Tensor: shape=(4,), dtype=int64, numpy=array([  8, 147,  41, 143])>, <tf.Tensor: shape=(1,), dtype=int64, numpy=array([40])>)
(<tf.Tensor: shape=(4,), dtype=int64, numpy=array([  15, 1083,   12, 5783])>, <tf.Tensor: shape=(1,), dtype=int64, numpy=array([9])>)
(<tf.Tensor: shape=(4,), dtype=int64, numpy=array([ 18, 160,   6,  38])>, <tf.Tensor: shape=(1,), dtype=int64, numpy=array([121])>)
(<tf.Tensor: shape=(4,), dtype=int64, numpy=array([11, 30, 27, 59])>, <tf.Tensor: shape=(1,), dtype=int64, numpy=array([2543])>)
Set data pipeline optimizations
Do async prefetching / buffering of the data for best performance on GPU
AUTOTUNE = tf.data.AUTOTUNE
train_ds = train_ds.shuffle(buffer_size=512).batch(batch_size, drop_remainder=True).cache().prefetch(buffer_size=AUTOTUNE)
Check the shape of the dataset (in batches):
train_ds.element_spec(TensorSpec(shape=(128, 4), dtype=tf.int64, name=None),
 TensorSpec(shape=(128, 1), dtype=tf.int64, name=None))
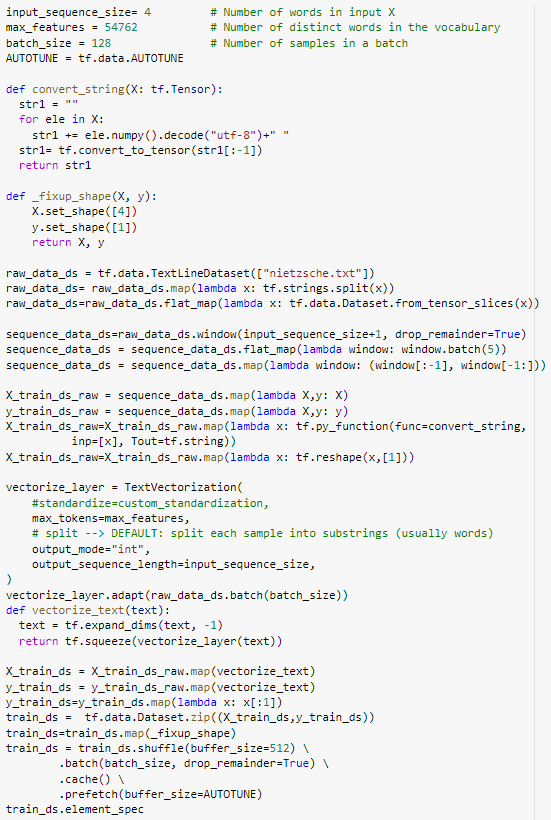
8. COMPLETE CODE

CONCLUSION:
In this tutorial, we apply the following steps to create Tensorflow Data Pipeline for word-level text generation:
- download a corpus
- split the text into words
- prepare input X and output y tuples
- vectorize the text by using the Keras preprocessing layer “TextVectorization”
- optimize the data pipelines by batching, prefetching, and caching.
In the next parts, we will see
- Part D: Recurrent Neural Network (LSTM) Model for Character Level Text Generation
- Part E: Encoder-Decoder Model for Character Level Text Generation
- Part F: Recurrent Neural Network (LSTM) Model for Word-Level Text Generation
- Part G: Encoder-Decoder Model for Word-Level Text Generation
Comments or Questions?
Please share your Comments or Questions.
Thank you in advance.
Do not forget to check out the next parts!
Take care!
References
tf.data: Build TensorFlow input pipelines
Text classification from scratch
Working with Keras preprocessing layers
Character-level text generation with LSTM
Toward Controlled Generation of Text
What is the difference between word-based and char-based text generation RNNs?
The survey: Text generation models in deep learning
Generative Adversarial Networks for Text Generation
FGGAN: Feature-Guiding Generative Adversarial Networks for Text Generation
How to sample from language models
How to generate text: using different decoding methods for language generation with Transformers
Hierarchical Neural Story Generation

